Pages

Pages

Sunday, January 29, 2012

Valentine's Day Strawberry Cake-In-A-Jar


I have a slight obsession with mason jars. We used them at our wedding as candle holders, so now we have over a hundred empty mason jars, which makes me VERY happy!
Mason jars are such an easy way to give a dessert, a candle or some wildflowers that vintage, home-made feel. They also make any kind of dessert very portable and easy to serve!


I decided to make some cute Valentine's Day Strawberry Cakes with Cream Cheese Frosting for my hunny. They were delicious, oh-so-simple, and super cute! Enjoy!


Valentine's Day Strawberry Cake-In-A-Jar
(makes 9 mason jar desserts)
INGREDIENTS:
1 18 oz. box Strawberry Cake Mix
3/4 cup water
1/3 cup oil
3 eggs
1/2 cup sour cream
red food coloring


DIRECTIONS:
1. Preheat oven to 350 degrees. Spray three 8" round cake pans with non-stick cooking spray. Set aside.
2. Blend the cake mix, water, oil, eggs and sour cream in a large bowl until all ingredients are moistened. Using a had mixer, beat on medium speed for 2 minutes.
3. Pour 1/3 of the strawberry cake batter into one of the cake pans. 
4. Add a 7-9 drops of food coloring to the remaining batter. Mix thoroughly. Pour half of that batter the second cake pan. 
5. To the of the batter add 5-7 more drops of red food coloring. Mix thoroughly. Pour this batter into the last empty cake pan. 
6. You should have three pans, with even amount of cake batter, in three shades: pink, red, and dark red. You can add as much or as little food coloring as you'd like to customize your shades of pink & red.
7. Bake cakes for 20-25 minutes or until a toothpick inserted in the center of the cake comes out clean. Remove from oven and let the cakes cool completely.
8. Using a round biscuit cutter, or any other object the same diameter as your mason jars, cut 9 circles out of each cake. You will have 27 circles total- 9 in each shade. Set these aside while you make the frosting.


Cream Cheese Frosting:
INGREDIENTS:
1 (8 oz) package cream cheese, softened
1/2 cup butter, softened
3-4 cups sifted confectioners' sugar
1 teaspoon vanilla sugar


DIRECTIONS:
1. In a medium bowl, cream together the cream cheese and butter until creamy.
2. Mix in vanilla and then gradually mix in the confectioners' sugar. Add more or less sugar, depending on how creamy or stiff you like your frosting.
3. Put the dark red cake circles in the bottom of your mason jars. Using a spoon or a pastry bag, pipe 1 tablespoon of frosting on top of the cake circle. 
4. Next, put the bright red cake circles on top of the frosting. Top with another tablespoon of frosting. Repeat with the pink cake circles. Top with some pink sprinkles and eat up!


Friday, January 27, 2012

Baked Spinach & Bacon Dip -- Great Super Bowl Snack!


I love that commercial they play (way too often) on the radio about bacon.
"Bacon... you can even put it on salad... SALAD." 
It gets me every time!


Bacon is one of the main reasons I could never go vegetarian/vegan. 
In my pursuit for the perfect Super Bowl Dip, I came across Martha Stewart's Bacon, Spinach & Onion Dip. I switched it up a little.

Here's my version, which I think is 10X better because it has twice the bacon that the original recipe calls for. 


This Baked Spinach & Bacon Dip will go fast at your Super Bowl party! My hubby and I finished it in just too sittings, and no I'm not proud of that. :)
Side note: I saw Martha at Costco two years ago for a book signing: she looks amazing.


Baked Spinach & Bacon Dip
(serves 10)
INGREDIENTS:
8 slices bacon, thinly sliced crosswise
1/2 medium yellow onion, finely diced
coarse sea salt and ground pepper
1 teaspoon all-purpose flour
2 packages (10 ounces each) frozen spinach, thawed & squeezed dry, & finely chopped**
3/4 cup whole milk
1/2 cup sour cream
1 (8 oz) pkg. cream cheese
1/2 cup grated Parmesan
Crostini or pita chips, for serving


DIRECTIONS:
1. Preheat oven to 350 degrees. In a medium saucepan, cook bacon over medium, stirring occasionally, until browned and crisp for 10 minutes. Drain bacon on paper towels. Discard all but 1 tablespoon of fat from pan.
2. Add onion to pan, season with salt and pepper and cook on medium heat (stirring occasionally) until onions are tender, 8 minutes. Add flour and cook for 30 more seconds. Add spinach, milk, sour cream and cheese. Cook, stirring for 2 minutes, until cream cheese melts.
3. Stir in bacon and 1/4 cup Parmesan cheese. 
4. Transfer mixture to a 1 1/2 quart baking dish and top with 1/4 cup Parmesan. Bake until bubbling, about 14 minutes. Heat broiler and broil until top browns, 3 minutes. 
5. Remove the dish from oven and let it sit for 5 minutes before serving. Serve the warm dip with crostini or pita chips. 


**if you like your spinach dip NOT chunky, put it in a blender or food processor for a minute before you transfer to a baking dish and bake in the oven.

Monday, January 23, 2012

Eggless Chocolate Caramel Thumbprint Cookies

How do all you people on the East Coast do it??
I currently live in Los Angeles where we get, what seems like, 3 rainy days a year. And when it rains all bets are off. I have no motivation to do anything! How sad is that?


I am definitely my father's daughter. He could live literally ON the equator and would be completely satisfied. He and I can't handle cold, wet weather. That probably explains why I've never seen real snow! 


Yes that's right- I'm 24 and never seen real snow. I figure I might as well wait until I have kids and then we can all take skiing classes together. haha


Anyway, these Eggless Chocolate Caramel Thumbprint Cookies are helping to keep me company on this cold, wet winter day. They're very simple to make and really hit that sweet-&-salty tooth. And they're a good go-to recipe when you're all out of eggs! 
Stay warm my little bakers!


Eggless Chocolate Caramel Thumbprint Cookies
(makes 2 1/2 dozen cookies)
INGREDIENTS:
1 1/4 cup all purpose flour
1/4 cup Dutch processed cocoa powder, sifted
1/4 tsp. kosher salt
1 stick salted butter, at room temperature
1/2 cup dark brown sugar, packed
1 tsp. pure vanilla extract
2-3 Tbsp. milk, at room temperature


4 oz. soft caramel chews (I used the generic Target brand, they worked perfectly!)
2 tbsp. whipping cream
sea salt


DIRECTIONS:
1. Center an oven rack and preheat the oven to 325F. Line cookie sheets with parchment paper or silicone baking mats.
2. In a small bowl, whisk together the flour, cocoa and salt to combine. Set aside.
3. In a medium bowl, using an electric mixer, beat the butter until fluffy. Gradually beat in the sugar and continue mixing until light and well combined. Add the vanilla, then milk. Add the dry ingredients and mix on a low speed just until the dough forms. Finish mixing with your hands to bring the soft dough together in one large ball.
4. Roll the dough into 1" balls. (I use a mini cookie scoop to measure out the dough, so the balls are uniform). Place them onto the baking sheet and flatten slightly with your hand. Using the end of a wine cork (I'm sure you all have a wine cork laying around- if you don't, change that!) press the cork about 1/4" deep and the diameter of a penny. 
5. Chill the formed cookie dough for 20 minutes in the refrigerator.
6. Bake the cookies, in batches, for 15 minutes until the cookies appear set. Cool on baking sheet for 2 minutes and transfer to a wire rack to cool completely.
7. Pour the caramel and cream in a small microwave-safe bowl. Microwave on 50% power for about a minute, pausing every 20 seconds to stir the caramels. Remove from microwave after a minute and stir until caramel and cream is smooth. Using a small spoon, spoon a teaspoon of caramel into each cookie "thumbprint". Top with some cracked sea salt, if you'd like.
8. Keep cookies in an airtight container for up to a week.


Recommended: a large glass of milk. These are rich!
Recipe Adapted from Baking Obsession

Saturday, January 21, 2012

Chewy Coconut M&M Sugar Cookies

To me, nothing is better than finding candy marked down to an outrageously low price. I'd take that over a buy-one-get-one-free shoe sale any day. But I guess that's just one of the many curses of having an abnormally large sweet tooth.


After holidays my husband and I scurry like mad men to the nearest Target, Walmart and Rite Aid in hopes of finding candy marked 30-50% off. One Halloween, while living in Newport, we found candy for 80% off. (Apparently the housewives in Newport don't feel the same way I do about candy- and I'm totally cool with that). 
You would be appalled at the obscene amount of candy we got that day. Luckily, we aren't over-eaters and that candy lasted for months and inspired many recipes.


I found these Coconut M&Ms in Target for only 29 cents per bag! My lucky find inspired these Chewy Coconut M&M Sugar Cookies. These Coconut M&M Cookies are super chewy (and stay that way for DAYS!) and have a subtle coconut-chocolate flavor from the M&Ms.
Side Note: Apparently Coconut M&M's don't actually have any coconut in them- just coconut flavoring. That was a surprise to me!


Chewy Coconut M&M Sugar Cookies
(12 extra large cookies, 24 small cookies)
INGREDIENTS:
1 1/3 cup all purpose flour
1/2 teaspoon baking soda
1/4 teaspoon baking powder
1/2 cup butter, softened
3/4 cup white sugar
1 egg
1/2 tsp. almond extract
1 cup coconut M&M's (about 3 small bags)


DIRECTIONS:
1. Preheat oven to 375 degrees F. In a small bowl, stir together flour, baking soda and baking powder. Set aside
2. In a large bowl, cream together the butter and sugar until smooth. Beat in egg and almond extract. Gradually blend in the dry ingredients. Roll rounded teaspoonfuls of dough into balls (for extra-large cookies: dough should be the size of a golf bowl) and place onto un-greased cookie sheets. Press down gently to flatten cookie dough balls slightly. Place as many Coconut M&Ms in each cookie as you'd like. 
3. Bake for 8-10 minutes for small cookies, 10-12 for large cookies. Let stand on cookie sheet for two minutes before removing to cool on a wire rack. Enjoy with a big glass of milk or coffee!


Tuesday, January 17, 2012

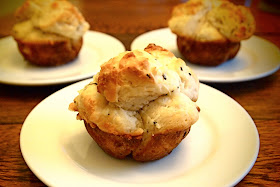
Mini Garlic Monkey Breads

These should be a staple at everyone's Super Bowl Party this year. They are light, fluffy, garlic-y, cheesy and most important super easy and cost effective!

 
This savory version of Monkey Bread is awesome, I love it! And it's also great because its ready in single servings. So the boys (and girls) can just grab one and get right back to the game.
Make these Mini Garlic Monkey Breads- you won't be disappointed!


Mini Garlic Monkey Breads
(makes 12-14 mini garlic monkey breads)
INGREDIENTS:
2 (7.5 oz) cans of buttermilk biscuits 
1/2 stick butter, melted
4 cloves garlic, minced
2 Tbsp. dried parsley flakes
1/2 cup grated Parmesan cheese, plus more to sprinkle on top

DIRECTIONS:
1. Preheat oven to 400 degrees. Cut each biscuit into 4 pieces. Roll each piece into a small ball and toss into a large bowl. Repeat for all the biscuits.
2. Combine the melted butter, garlic, parsley and 1/4 cup Parmesan cheese together and pour over the biscuit pieces.
3. Gently toss the biscuit pieces to evenly coat all the pieces with the butter mixture.
4. Using a 12 cup muffin tin, place 5-7 pieces of the coated biscuit dough into each muffin cup. Use the additional Parmesan cheese to sprinkle on the top of the breads in the muffin cups. 
5. Bake at 400 degrees for 12-14 minutes until golden brown. Serve warm. Great with a marinara sauce or ranch dip! 

Recipe adapted from Real Mom Kitchen

Sunday, January 15, 2012

Easy Mini Blueberry Cinnamon Rolls


Today we are getting a couple's massage! I. CAN'T. WAIT. 

If I were a billionaire that would be the first thing I would get- a live in masseuse. No personal trainer, no Louis Vuitton luggage, no Christian Louboutin's (although that would be nice too)... just a massage every day. 


But for now, my husband and I get each other a couple's massage for our birthdays. It's so nice to relax with each other and its a present for the both of us! I think tradition will be continuing for many years to come...

These ity-bity Mini Blueberry Cinnamon Rolls were the perfect way to start of a very relaxing Sunday. 
The recipe I originally saw was for plain cinnamon rolls, but I decided to jazz it up a bunch since I have large bowl full of fresh blueberries just waiting to be used. 
No need to fuss with making dough from scratch- simply use crescent rolls. They give a great buttery, fluffy taste to the rolls.
Enjoy your Sunday!


Easy Mini Blueberry Cinnamon Rolls
(makes 16 mini cinnamon rolls)
INGREDIENTS:
Blueberry Filling:
1/2 cup fresh blueberries
2 Tablespoons granulated sugar
1 tsp. cornstarch
1/4 cup water

Cinnamon Rolls:
1- 8 oz. tube crescent roll dough
2 Tablespoons butter, melted
1/4 cup sugar
1 Tablespoon cinnamon

Icing:
3/4 cup powdered sugar, sifted
1 Tablespoon milk

DIRECTIONS:
1. Prepare Blueberry Filling: In a small saucepan combine all four ingredients over medium-high heat. Bring to a boil, then reduce heat to medium-low and continue to stir for 2 more minutes. Remove from heat and allow it to cool. The blueberry filling will thicken to a jam-like consistency. Cool completely before using on your cinnamon rolls. 
2. Preheat oven according to crescent roll dough package directions (mine was 375 degrees.) Combine the sugar and cinnamon in a small bowl. Set aside.
3. Layout half the dough (4 triangles) on a cutting board dusted with flour. Pinch all the seams together. Flip the dough over and pinch the seams on the back side together too. It will now be one square piece of dough. 
4. Use a rolling to smooth the seams and roll the dough into a square about 1/4" thick. 
5. Brush with 1 tablespoon of butter. Top the dough with half of the blueberry filling. Spread out evenly and sprinkle half the cinnamon sugar mixture. (You can use more if you'd like!)
6. Roll the dough into a log, sealing the ends so the blueberry filling doesn't come out the sides. Use a sharp knife to cut log into 8 pieces.
7. Repeat steps 3-6 with the other half of the dough.
8. Place mini blueberry cinnamon rolls into a non-stick sprayed mini muffin tin.
8. Bake according to package directions.
9. While they are baking, whisk together the milk and sifted powdered sugar. Drizzle over warm cinnamon rolls. Yum!

*For an even easier recipe, omit the blueberry fillings and make plain Mini Cinnamon Rolls- just as tasty!

Recipe adapted from Iowa Girl Eats


Friday, January 13, 2012

Super Bowl Mini BBQ Chicken Pizzas

Beer and PIZZA! Staples at any Super Bowl Party.


Now you can make something cute & delicious for all your Super Bowl guests.
These are great for feeding the masses efficiently and quickly!


We got this recipe from our good friends Haley & Kylle, who made it at our one of our family pizza nights. It was by far the favorite pizza.
The caramelization of the onions, pineapple and beer add such a nice compliment to the sweet BBQ sauce and the cilantro helps to brighten all the flavors. 
They are sure to be the favorite out of the spread of Super Bowl snacks.


Mini BBQ Chicken Pizzas
(makes 8 mini pizzas)
INGREDIENTS:
1 pkg. pizza dough (Trader Joe's has great pizza dough)
1 chicken breast, boiled and chopped
1/2 red onion, diced
2 tsp. olive oil
2 cloves garlic, minced
1 cup pineapple chunks (fresh is best!)
1/2 of your favorite beer
1/2 - 3/4 cup BBQ sauce
1/2 cup shredded cheddar cheese
1/2 cup shredded mozzarella cheese
cilantro (optional)


DIRECTIONS:
1. Boil one chicken breast in a large pot full of water. Remove the chicken, and once cooled chop into small pieces. Set aside for later use. 
2. Preheat oven to 425 degrees F. Grease a cookie sheet with olive oil. Set aside. Take pizza dough and divide and roll into 8 golf ball sized balls. Press each dough ball between the palm of your hands to flatten into a 1/4" thick flat circle. Evenly space the 8 pizza crusts onto your greased cookie sheet.
3. Saute diced red onion, olive and garlic in a large skillet on medium-high heat. Cook for 2-3 minutes or until the onions are softened. 
4. Add the pineapple chunks and cook for 3 more minutes on medium heat.
5. Add 1/2 of your favorite beer (drink the rest - you serve it!) to the skillet and reduce to medium-low heat. Simmer for 10 minutes or until the beer reduces down completely. The mixture will begin to caramelize and become a little sticky. 
6. Add 3/4 cup BBQ sauce to the mixture. Bring heat back up to medium-high and simmer for 2 more minutes. 
7. Mix in the cooked chopped chicken and evenly coat the chicken with the BBQ mixture.
8. Evenly disperse the BBQ mixture among the 8 mini pizza crusts. Top with a little cheddar and mozzarella cheese. 
9. Bake at 425 degrees for 9-11 minutes, depending on how crispy you like your crust. Once the pizzas have cooled slightly, top with chopped cilantro. 
10. Enjoy with an ice cold beer :)

Thursday, January 12, 2012

Baked Eggs


Eggs.


Lately I have been obsessed with eggs- scrambled, sunny-side up, fried, hard-boiled and now BAKED!
These eggs take on a wonderful flavor when baked, rather than cooked in the conventional manner. Its also so convenient being able to make 1 egg or 15 eggs at a time! 


Simply multiply the recipe according to how many eggs you'd like. 
Our magic number was 3- two for the hubby, one for me (although I easily could've eaten 4).


Baked Eggs:
INGREDIENTS:
1 slice bacon
1 teaspoon melted butter
1 egg
1/2 slice good quality Cheddar Cheese*


DIRECTIONS:
1. Preheat oven to 350 degrees F.
2. Place bacon in a large, non-stick skillet. Cook bacon over medium-high heat until even brown on both sides, but not crispy.
3. Wrap bacon slice around the inside of a muffin cup. Place the melted butter in the bottom of the muffin cup. Drop in the egg.
4. Bake in preheated oven for 12 minutes. Place cheese over egg, and continue cooking until cheese is melted and egg is cooked. (For me it took another 3 minutes- 15 minutes in total).
5. Garnish with some green onions, salt and pepper, and enjoy with a biscuit & cup-o-joe!


*I used Tillamook Sharp Cheddar, the higher the quality of cheese, the better your egg will taste.
Recipe adapted from AllRecipes


Monday, January 9, 2012

Apple-Cream Cheese Bundt Cake with Praline Frosting


What are some of your favorite foodie magazine? Mine is by far Southern Living
The desserts in particular are absolutely divine... this Apple-Cream Cheese Bundt Cake is a perfect example.


This cake is suitable for both dessert and breakfast. It is a pretty dense cake and has the consistency of a pound cake or sour cream coffee cake. I love cakes that can be "acceptable" for breakfast!  
The applesauce and cream cheese gave it the perfect amount of moisture and the praline topping added sweetness.
Enjoy!!


Apple-Cream Cheese Bundt Cake with Praline Frosting
(16 servings)
Cream Cheese Filling:
1 (8 oz.) package cream cheese, softened
1/4 cup butter, softened
1/2 cup granulated sugar
2 Tbsp. all-purpose flour
1 tsp. vanilla extract


Apple Cake Batter:
3 cups all-purpose flour
1 cup granulated sugar
1 cup firmly packed light brown sugar
2 tsp. ground cinnamon
1 tsp. salt
1 tsp. baking soda
1 tsp. ground nutmeg
1/2 tsp. ground cloves
3 large eggs, lightly beaten
3/4 cup vegetable oil
3/4 cup applesauce*
1 tsp. vanilla extract
3 cups peeled and finely chopped apples (I used fuji)
1 cup finely chopped pecans


Praline Frosting:
1/2 cup firmly packed light brown sugar
1/4 cup butter
3 Tbsp. milk
1 tsp. vanilla extract
1 cup powdered sugar, sifted


DIRECTIONS:
1. Prepare filing: Beat first 3 ingredients at medium speed with an electric mixer until blended and smooth. Add egg, flour, and vanilla; beat just until blended.
2. Prepare Batter: Preheat oven to 350 degrees F. Stir together 3 cups flour and next 7 ingredients. Stir in the three beaten eggs, stirring just until dry ingredients are moistened. Stir in apples and pecans.
3. Spoon half of apple mixture into a greased and floured 14 cup Bundt pan. Spoon Cream Cheese filling over apple mixture, leaving a 1-inch border around edges of pan. Swirl filling through apple mixture using a paring knife. Spoon remaining apple mixture over Cream Cheese filling.
4. Bake at 350 degrees F for 1 hour 15 minutes or until a long wooden pick inserted into the center of the cake comes out clean. Cool cake in pan on wire rack for 15 minutes. Remove from pan to wire rack and cool completely (for 2 hours).
5. Prepare Frosting: Bring brown sugar, butter and milk to boil in a small saucepan over medium heat. Whisk constantly for 1 minutes. Remove from heat; stir in vanilla. Gradually whisk in *sifted* powdered sugar until smooth. Stir gently for 3-5 minutes or until mixture begins to cool and thicken slightly. Pour immediately over cooled cake. Top with chopped pecans and dig in!


*I used my homemade applesauce
(Recipe adapted from Southern Living Magazine)

Sunday, January 8, 2012

HOMEMADE Cinnamon Raisin English Muffins

When I came upon this recipe, I couldn't believe my eyes! 
I always thought English Muffins were baked-- am I the only one that thought this?


Apparently you cook them the same way you cook a pancake-on the skillet!
My husband LOVES Cinnamon Raisin English Muffins and couldn't believe I made them from scratch. Funny how the simplest recipes can impress people sometimes :)
These look, taste and smell exactly like store-bought English Muffins. Enjoy!


Homemade Cinnamon Raisin English Muffins:
INGREDIENTS:
(makes 10 muffins)
1/3 cup water, warm
1 Tablespoon granulated sugar
2 1/2 teaspoons active dry yeast (1 package)
1 cup nonfat milk, slightly warm**
3/4 teaspoon salt
1 teaspoon ground cinnamon
2 cups all purpose flour
2/3 cup raisins

DIRECTIONS:
1. In a large bowl, whisk together water, sugar and yeast and let mixture stand for 10 minutes, until slightly foamy.
2. Using a wooden spoon, stir in remaining ingredients expect the raisins. Mix until smooth. One the batter comes together, stir in the raisins.
3. Cover with plastic wrap and set aside for 45 minutes to relax and rise.
4. Heat a griddle/nonstick frying pan over medium heat. Lightly grease with cooking spray only if you are using a non-stick pan.
5. Drop 1/4 cup of dough at a time onto greased surface. (I used my cupcake scooper and it worked perfectly!) Cook the muffins until medium brown on the bottom. The top will look set and the sides will appear somewhat dry. It took me 4 minutes per side, but could take more or less time depending on the temperature of your griddle. Flip the muffins over and cook the second side until golden brown.
6. Cool on a wire rack for at least 15 minutes or until completely cool. 
7. When ready to serve, split muffins in half and toast. For optimum satisfaction, top muffins with butter & cinnamon-sugar. 

**Its very important you use non-fat milk in order to have the right amount of air pockets and crumble to your muffins. Whole milk will work also, but non-fat is the best. 

Recipe adapted from Baking Bites

Friday, January 6, 2012

Mini Carrot Spice Muffins


These Mini Carrot Spice Muffins are unique because they're topped with flax granola! 

The crunch of the granola was perfect on these little babies and WAY healthier than any streusel topping.


Next up on the Mini Baker blog... HOMEMADE Cinnamon Raisin English Muffins. Stay Tuned my fellow bakers :)

Mini Carrot Spice Muffins
(makes 30 mini muffins)
INGREDIENTS:
2 cups all purpose flour
1 Tbsp. baking powder
1 1/2 tsp. ground cinnamon
1/2 tsp. ground cloves
1/2 tsp. ground ginger
1/4 tsp. salt
1/2 cup sugar
1/3 cup packed light brown sugar
2/3 cup vegetable oil
2 large eggs
1 tsp. vanilla extract
3/4 cup whole milk
1 cup finely shredded carrots
1/2 cup shredded sweetened coconut
1/2 cup flax granola (or granola of your choice)

DIRECTIONS:
1. Preheat the oven to 375 degrees F. Line a mini muffin pan with paper or foil liners.
2. In a medium bowl, combine the flour, baking powder, cinnamon, cloves, ginger, baking soda and salt. Stir together and set aside. In the bowl of a stand mixer fitted with the paddle attachment, combine the sugar, brown sugar and vegetable oil. Mix until smooth.
3. Add in the eggs and vanilla extract and beat until incorporated. Add in the dry ingredients in two additions, alternately with the milk, mixing each addition just until incorporated.
4. Fold in the shredded carrot and coconut. Divide the batter evenly among the muffin cups. Top the batter with 1 tsp. of granola.
5. Bake for 15-17 minutes or until a toothpick inserted in the center of a muffin comes out clean. Allow to cool in the pan 5 minutes, then remove the muffins to a wire rack to cool completely. Enjoy!

Thursday, January 5, 2012

Peanut Butter Cookies ... Dipped in Chocolate!

Anything dipped in Chocolate is better, right?
The answer is YES!


These Peanut Butter Cookies are so simple and so pretty. Perfect for any gathering!
I love all the crunch from the peanuts, chewiness from all the peanut butter, and richness of the chocolate.
Happy Baking all my little bakers!


Sidenote: The beautiful cutting board in these photos was the last cutting board my talented Danish Grandfather made before he died. So lucky to have this beautiful piece of art! 


Peanut Butter Cookies Dipped in Chocolate
(makes 30 cookies)
INGREDIENTS:
1 cup unsalted butter, softened
1 cup packed brown sugar
1/2 cup sugar
3/4 cup creamy peanut butter
1/2 cup chunky peanut butter
2 eggs
1 teaspoon vanilla extract
1 3/4 cup flour
2 teaspoons baking soda
1/2 teaspoon kosher salt
1 cup quick oats


2 cups semisweet chocolate
1/2 cup finely chopped peanuts


DIRECTIONS:
1. Preheat oven to 350 degrees F. 
2. In a large bowl, cream together butter, brown sugar, white sugar and both peanut butters until smooth.
3. Beat in the eggs, one at a time until well blended add in vanilla and mix to combine.
4. In a medium bowl, combine the flour, baking soda and salt; stir into the creamed mixture. Mix in the oats until just combined. Drop rounded tablespoons onto un-greased cookie sheets.
5. Bake for 11-13 minutes, or until just lightly browned. Cool for 5 minutes on cookie sheet, then transfer to a cooking rack.
6. Once the cookies are completely cooled, melt the chocolate chips in a microwave. Stir every 30 seconds until the chips are completely melted and smooth.
7. Working over the bowl of melted chocolate, spoon the chocolate over 1/2 of the cookie. Allow the excess chocolate to flow back into the bowl. Sprinkle the wed chocolate with chopped peanuts and place on wax paper to harden.
8. Store in an air-tight container and enjoy for up to 3 days for optimum freshness!


Recipe adapted from: My Baking Addiction

Wednesday, January 4, 2012

Homemade Applesauce


It's a new year! Can you believe it?
What are some of your resolutions?
Mine are to fully enjoy life and everything it has to offer; live in the moment; and to improve my health & well being-- including lots of yoga and meditation :)
In college I took a Buddhist Art History course in which for the first half hour of each lecture, all we did was meditate. (Awesome teacher, I know!) It's amazing how much it improves the clarity of life. 
As far as improving my health goes... Well, being a baker isn't exactly healthy- but hey, at least I'm enjoying life and food to the fullest


In an effort to make something "healthy" I stumbled across a delicious, chunky Apple Sauce recipe. It is delightful and has the perfect touch of sweetness and spice from the cinnamon.
Enjoy!

Homemade Apple Sauce
(makes 2 mason jars, 4-6 servings)
INGREDIENTS:
4 apples - peeled, cored and chopped
3/4 cup water
1/4 cup white sugar*
1/2 teaspoon ground cinnamon


DIRECTIONS:
1. In a saucepan, combine apples, water, sugar, and cinnamon.
2. Cover and cook over medium heat for 15 to 20 minutes, or until apples are soft.
3. Allow to cool, then transfer to blender and pulse until the applesauce becomes a thick sauce with small apple chunks. 
4. Transfer to mason jars or other sealable containers. Applesauce will keep for up to 2 weeks in the refrigerator. Serve chilled or warm over vanilla ice cream-yum!


*Or use 1/4 cup Truvia/Stevia in replace of the sugar for an extra healthy treat
(recipe adapted from AllRecipes)